
Get your team back on track—learn why multi-user mode fails, what’s blocking access, and how to resolve Error H202 step by step. No tech jargon, just clear solutions.
This is one of those stubborn QuickBooks errors that tends to appear at the worst possible time — right when your team needs shared access to the company file. The error usually pops up when your computer (called a workstation in QuickBooks terms) can’t connect to the server computer where your company file is stored.
In simpler words, QuickBooks is trying to start a conversation with your server, but the message never gets through. Maybe the firewall blocked it, maybe your network hiccuped, or maybe QuickBooks itself is just confused about who’s hosting the file. Whatever the reason, the result is the same — multi-user mode won’t work, and you can’t open your shared company file.
The good news? This error is completely fixable. You don’t need to be a tech expert or an accountant with a computer science degree to resolve it. In this 2025 updated guide, we’ll break down everything in plain English — why Error H202 happens, what’s going on behind the scenes, and exactly how to fix it step by step.
By the end, you’ll not only get your QuickBooks running in multi-user mode again but also understand how to prevent this problem from coming back in the future.
Let’s start by breaking down what this error actually means — because understanding it is half the battle.
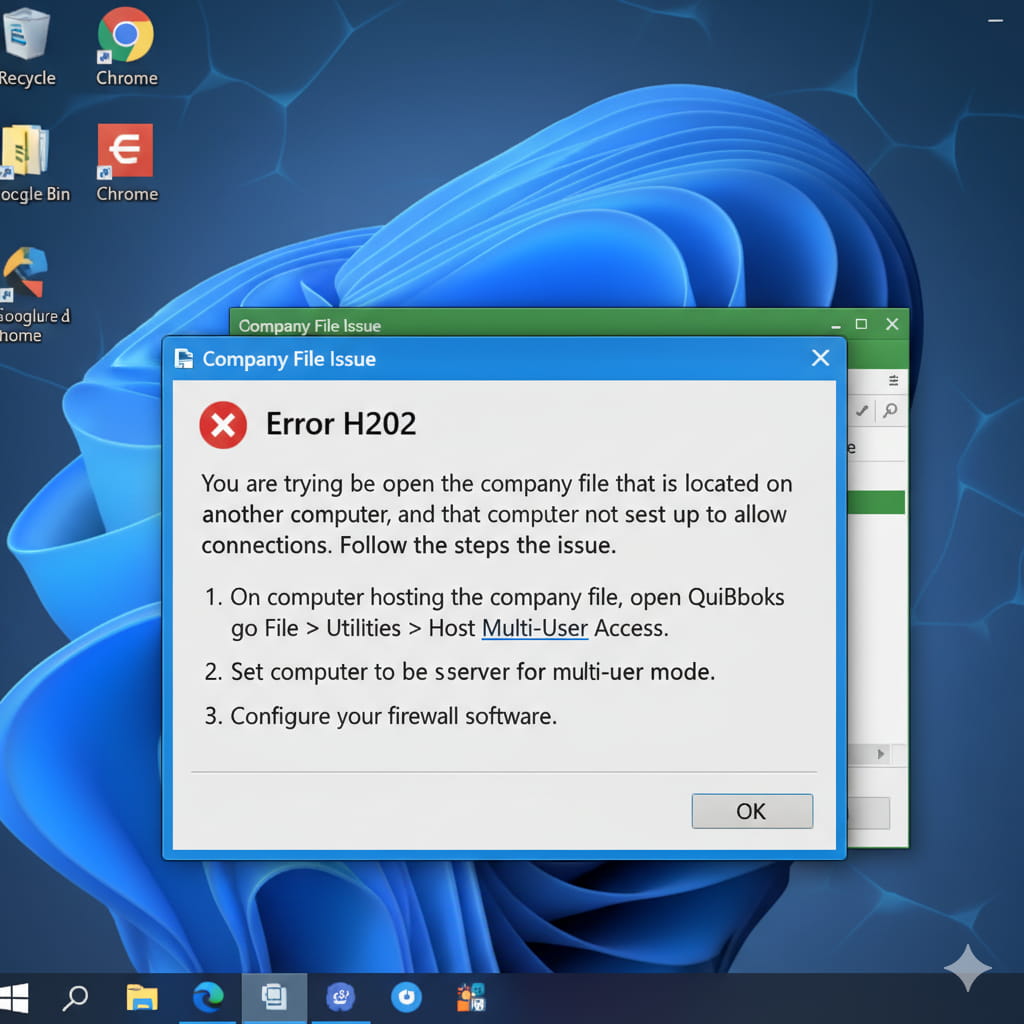
QuickBooks Error H202 shows up when your QuickBooks Desktop on one computer (your workstation) tries to open a company file that’s saved on another computer (your server), but something gets lost in translation. Essentially, your QuickBooks is calling out to the server — “Hey, can I open this company file?” — and the server never answers back.
When this happens, you’ll usually see a pop-up message that reads:
“This company file is on another computer, and QuickBooks needs some help connecting. Error code: H202.”
Image: Screenshot showing QuickBooks Error H202 pop-up message
Now, here’s what’s really going on behind the scenes. QuickBooks uses your network to communicate between computers in multi-user mode. If that communication gets interrupted — maybe the network connection is unstable, the hosting configuration isn’t set up correctly, or your firewall is blocking QuickBooks ports — the workstation can’t reach the server. When that happens, QuickBooks throws the H202 error to let you know that something’s blocking access.
Think of it like this: your server is the library holding your company file, and your workstation is the librarian who needs the book. But if the door between the librarian and the library is locked — whether because of a firewall, misconfigured settings, or a broken key (corrupted network data) — QuickBooks can’t open that door, and the H202 message appears.
In short, Error H202 means QuickBooks is struggling to connect to the host computer that keeps your company file safe. The root cause could be as simple as a blocked connection or as complex as a misconfigured network service. Either way, once we pinpoint the reason, fixing it is completely doable.
Alright, now that you’ve got a clear picture of what’s causing the H202 error, let’s roll up our sleeves and actually fix it. The good news? You don’t need to be a network engineer or a tech wizard to get this done. Each solution is simple enough to follow if you take it step by step — and we’ll walk through every part together.
We’ll start with the basics: testing your network connectivity. This quick check helps confirm whether your computer and the server that stores your QuickBooks company file are talking to each other properly.
Think of this step as a “connection check.” Before you try any advanced fixes, it’s best to see if your workstation (the computer showing the error) can even see the server on the network. If it can’t, then QuickBooks definitely won’t be able to either.
Here’s how you can test it:
If everything’s working fine, you’ll see reply messages that show the server’s IP address and the time it took to respond. This means your workstation and server can see each other over the network — a good sign.
However, if you see Request Timed Out, Destination Host Unreachable, or notice that packets are being lost, that means there’s a problem with your network connection. In that case:
Image: Example of Successful Ping vs. Failed Ping Output
Testing network connectivity might sound basic, but it’s one of the most important first steps. It helps you rule out a lot of guesswork. If your workstation can’t ping the server, no other QuickBooks fix will work until that communication issue is resolved.
Once your network is stable and the ping test returns a healthy response, you’re ready to move on to the next step — using QuickBooks’ built-in repair tool to automatically fix connection issues.
If the network test didn’t reveal any major issues but you’re still seeing the H202 error, it’s time to bring out one of the most reliable tools in the QuickBooks world — QuickBooks File Doctor.
This handy tool, created by Intuit (the company behind QuickBooks), is like a digital mechanic for your accounting software. It automatically scans your setup to detect and fix common problems that can block your workstation from connecting to the company file — including network issues, damaged company files, or misconfigured multi-user settings.
In short, if something invisible is breaking the link between your computer and the server, File Doctor is often the fastest way to uncover it.
When QuickBooks throws Error H202, it’s usually because it can’t reach or verify the hosting computer. The File Doctor runs a detailed connectivity check, tests your network ports, scans for damage in your company file, and resets QuickBooks’ internal paths — all automatically. Think of it as a one-click solution that performs multiple technical fixes at once.
Once the scan finishes, File Doctor will automatically fix any detected issues related to network configuration, damaged files, or missing permissions.
When the tool says the repair is complete, close the File Doctor window and reopen QuickBooks Desktop. Then:
If everything went well, QuickBooks should connect without showing Error H202 — meaning your workstation and server are finally communicating again.
If you still get the H202 message after using File Doctor, don’t get discouraged. Sometimes the tool can’t fix deeper network or firewall issues that need manual configuration (which we’ll handle in the next solution).
The File Doctor’s job is to fix internal problems inside QuickBooks or the company file. If those are resolved but the connection still fails, the issue likely lies in your server settings or Windows Firewall — and we’ll address that next.
If the first two methods didn’t fully resolve the issue, don’t worry — you’re making solid progress. The next step is to check the QuickBooks Database Server Manager (often called QBDBSM).
This service might sound technical, but think of it as the “traffic controller” that allows QuickBooks to share company files between different computers. It manages all incoming and outgoing data requests when multiple users try to open or edit the same file.
If the Database Server Manager isn’t installed, isn’t running, or hasn’t been set up properly, QuickBooks won’t be able to open the company file in multi-user mode — and that’s exactly when you’ll see the H202 error pop up.
So, the goal here is to make sure QBDBSM is running correctly and that it has the proper permissions to communicate through your network and firewall.
Every time a user opens a QuickBooks company file over the network, the Database Server Manager is what authenticates that connection. It’s like a receptionist — it checks who’s trying to access the file, makes sure they’re allowed, and then hands over the right data.
If this “receptionist” is offline, unregistered, or blocked by your firewall, your workstations will be left waiting at the door with no access.
Let’s walk through the process carefully. You’ll only need to do this on your server computer (the one that stores your company file).
If you’ve already configured the Database Server Manager and the H202 error is still giving you trouble, it’s time to dig one layer deeper — into the background services that keep QuickBooks running in multi-user mode.
Behind the scenes, QuickBooks relies on two key Windows services to manage data sharing and communication between computers:
If either of these services isn’t running, QuickBooks can’t process multi-user requests, and your workstation loses connection to the server. The good news? You can easily verify and fix them right from your Windows settings.
Think of these services as the “heartbeat” of QuickBooks networking. The Database Server Manager service (QuickBooksDBXX) controls file sharing, while QBCFMonitorService ensures that every user’s connection stays stable and synchronized.
If one of these services stops unexpectedly — maybe due to a Windows update, antivirus interference, or manual changes — QuickBooks immediately loses its ability to host files in multi-user mode, which triggers Error H202.
By verifying and restarting these services, you’re making sure that QuickBooks has the background support it needs to run smoothly.
Once both services are confirmed to be running, go ahead and open QuickBooks on your server computer first, followed by your workstations.
On any workstation, navigate to File > Switch to Multi-User Mode.
If everything’s set correctly, your company file should now open seamlessly across multiple systems — and that pesky H202 error should finally disappear.
If you’ve verified your QuickBooks services and still keep seeing that stubborn H202 error, the next likely suspect is your Windows Firewall.
Here’s the thing — your firewall’s job is to protect your computer from unauthorized connections. That’s great for security, but sometimes it gets a little overprotective and ends up blocking QuickBooks too. When that happens, QuickBooks can’t exchange data between your workstation and the server, which leads straight to Error H202.
The fix? We’ll manually create a few exceptions inside your firewall so QuickBooks can communicate freely again — safely and securely.
QuickBooks uses specific ports (digital pathways) to send and receive information between your computers. Think of these ports like dedicated phone lines that QuickBooks uses to talk across devices.
If those ports are closed or blocked, QuickBooks can’t “call” the server — and the conversation ends before it even starts. By opening the correct ports, you’re basically saying, “Hey firewall, it’s okay — this traffic is trusted.”
Let’s walk through the process step by step. Don’t worry — this might sound technical, but it’s actually pretty simple once you know where to click.
Once both inbound and outbound rules are created, close all open windows and restart your computer.
After restarting:
If the firewall was blocking your connection, QuickBooks should now be able to talk to the server freely — meaning the H202 error should be gone for good.
If you’d rather not manually add ports, you can let the QuickBooks Database Server Manager do the job automatically. When you scan your folders using that tool (like in the previous solution), it typically updates your firewall rules behind the scenes.
However, doing it manually gives you extra peace of mind — especially if your system uses stricter security policies or third-party firewalls.
If you’ve come this far and QuickBooks still can’t connect to the server, don’t worry — you’re getting closer to the root cause. Sometimes, the issue isn’t about firewalls or services at all; it’s about how your workstation identifies the server.
In simpler terms, your computer might be having trouble recognizing the “name” of your server computer. It’s as if QuickBooks is trying to send a message to “QBServer,” but your workstation doesn’t know where that is. This is where the Windows host file comes in.
The host file is like your computer’s personal address book for the internet and local networks. It maps computer names to IP addresses — so when you type or use a computer name (like “QBServer”), your system knows exactly where to find it on the network.
If that mapping isn’t there or is incorrect, QuickBooks won’t know where to look for the company file. By manually adding the correct information to the host file, you’re giving your computer a direct route to your server — no confusion, no delays.
Use this method if:
On a new line, type your server’s IP address, press the Tab key, and then type the server name. Example: 192.168.0.101 QBServer
If you’ve come this far and QuickBooks still can’t connect to the server, don’t worry — you’re getting closer to the root cause. Sometimes, the issue isn’t about firewalls or services at all; it’s about how your workstation identifies the server.
In simpler terms, your computer might be having trouble recognizing the “name” of your server computer. It’s as if QuickBooks is trying to send a message to “QBServer,” but your workstation doesn’t know where that is.
This is where the Windows host file comes in.
The host file is like your computer’s personal address book for the internet and local networks. It maps computer names to IP addresses — so when you type or use a computer name (like “QBServer”), your system knows exactly where to find it on the network.
If that mapping isn’t there or is incorrect, QuickBooks won’t know where to look for the company file. By manually adding the correct information to the host file, you’re giving your computer a direct route to your server — no confusion, no delays.
Use this method if:
Image: Successful Multi-User Connection After Host File Update
QuickBooks needs full read-and-write access to the folder where your company file lives. If the folder is locked down — maybe due to Windows security settings, past software updates, or even antivirus restrictions — QuickBooks can’t open the file properly in multi-user mode. That’s when Error H202 shows up again, even if everything else is configured correctly.
One of the easiest ways to fix this is to simply create a brand-new shared folder on your server and give it full access permissions. Think of it as giving QuickBooks a clean, open space to work in — free of any old permission conflicts.
Every QuickBooks company file (.QBW) sits inside a folder that controls who can access it and what they’re allowed to do. If those permissions get messed up — for example, if one user only has “read” access while another needs “write” access — QuickBooks won’t be able to sync data across multiple computers.
Creating a new folder resets all of that. It’s like moving your file into a new office where everyone has the right key to enter.
If QuickBooks connects successfully and the H202 error disappears, that’s a strong sign the original folder’s permissions were the culprit. The new shared folder, with clean access settings, allows QuickBooks to sync across all workstations without hitting permission barriers.
If you’re curious, you can double-check the difference by comparing the Security settings of your old and new folders — you’ll likely notice that the older one had limited or outdated user rights.
By now, you’ve handled firewalls, permissions, and network settings — but sometimes, Error H202 has a more “internal” cause. Specifically, it can appear if your QuickBooks Desktop installation or its network configuration files are corrupted or incomplete.
That’s where the QuickBooks Install Diagnostic Tool comes in handy.
This official Intuit utility acts like a full-system scan for QuickBooks, detecting and fixing hidden problems with your installation, Microsoft components, or network setup that might be blocking multi-user access.
Even if QuickBooks appears to be installed correctly, one or more background components (like .NET Framework, MSXML, or C++ redistributables) could be misconfigured. These components are essential for QuickBooks to connect properly over your network.
When something goes wrong there, you might see H202, H505, or even installation-related errors. The Install Diagnostic Tool checks all those dependencies for you — and repairs them automatically.
If you’ve already installed the QuickBooks Tool Hub, you can run the Install Diagnostic Tool directly from there. Just open the Tool Hub, go to the Installation Issues tab, and select QuickBooks Install Diagnostic Tool.
This makes it easier to troubleshoot without manually downloading and managing separate files.
Image: QuickBooks Tool Hub – Installation Issues Tab
If, after using this tool, the H202 error still persists, it’s time to make sure that QuickBooks’ hosting configuration is set correctly — which brings us to the next and final fix.
At this stage, you’ve probably eliminated most network and permission problems. But there’s one last subtle issue that can still trigger Error H202 — multiple computers trying to host the same company file.
This happens more often than you’d think. QuickBooks is designed so that only one computer (the server) should host the company file, while all other systems simply access it. If even one workstation accidentally tries to act as a host, QuickBooks gets confused and displays H202.
Think of QuickBooks hosting like a conference call. You need one organizer — not five. If every participant tries to host the meeting, no one can hear each other clearly.
In QuickBooks terms, that means conflicting hosting setups that block communication between the workstation and the main server.
So, we’ll make sure that only the server is hosting, and all other systems are set to Local Files Only.
By now, you’ve handled firewalls, permissions, and network settings — but sometimes, Error H202 has a more “internal” cause. Specifically, it can appear if your QuickBooks Desktop installation or its network configuration files are corrupted or incomplete. That’s where the QuickBooks Install Diagnostic Tool comes in handy.
This utility acts like a full-system scan for QuickBooks, detecting and fixing hidden problems with your installation, Microsoft components, or network setup that might be blocking multi-user access.
Even if QuickBooks appears to be installed correctly, one or more background components (like .NET Framework, MSXML, or C++ redistributables) could be misconfigured. These components are essential for QuickBooks to connect properly over your network.
When something goes wrong there, you might see H202, H505, or even installation-related errors. The Install Diagnostic Tool checks all those dependencies for you — and repairs them automatically.
If you’ve already installed the QuickBooks Tool Hub, you can run the Install Diagnostic Tool directly from there. Just open the Tool Hub, go to the Installation Issues tab, and select QuickBooks Install Diagnostic Tool.
This makes it easier to troubleshoot without manually downloading and managing separate files.
Image: QuickBooks Tool Hub – Installation Issues Tab
If, after using this tool, the H202 error still persists, it’s time to make sure that QuickBooks’ hosting configuration is set correctly — which brings us to the next and final fix.
At this stage, you’ve probably eliminated most network and permission problems. But there’s one last subtle issue that can still trigger Error H202 — multiple computers trying to host the same company file.
This happens more often than you’d think. QuickBooks is designed so that only one computer (the server) should host the company file, while all other systems simply access it. If even one workstation accidentally tries to act as a host, QuickBooks gets confused and displays H202.
Think of QuickBooks hosting like a conference call. You need one organizer — not five. If every participant tries to host the meeting, no one can hear each other clearly.
In QuickBooks terms, that means conflicting hosting setups that block communication between the workstation and the main server.
So, we’ll make sure that only the server is hosting, and all other systems are set to Local Files Only.
This disables hosting on the workstation, ensuring that only your main server is responsible for hosting the company file.
By now, you’ve adjusted your firewall, verified QuickBooks services, configured hosting, and even cleaned up network settings. The final step is to bring everything together with a clean system restart and make sure QuickBooks recognizes all the changes you’ve made.
Think of this as the “refresh” button that locks in all the previous fixes. Restarting the right services and reloading QuickBooks ensures your system re-establishes a healthy connection between your server and workstations — without holding onto any old error states.
When you tweak configurations — like ports, services, and permissions — those changes don’t always take effect immediately. Some of them need a full restart to properly register across the network.
Restarting your server and QuickBooks services clears out any lingering network caches or outdated settings that could still be blocking the connection. It’s like giving QuickBooks a fresh start, free from any “memory” of the H202 issue.
If everything’s set up correctly, you should see your company file open smoothly — no more waiting, no more H202 pop-ups.
Keeping Error H202 from coming back doesn’t require deep tech skills — just a few smart maintenance habits that keep your QuickBooks environment healthy and your workflow uninterrupted.

Let’s go through a few best practices that’ll help you avoid seeing that error ever again.
Think of updates as your system’s “vitamins.” They strengthen your software against bugs, compatibility issues, and security vulnerabilities that could lead to connectivity errors like H202.
A few minutes spent updating now can save hours of troubleshooting later.
Your QuickBooks Database Server Manager is the backbone of multi-user mode. It manages the data traffic between your server and workstations — like an air traffic controller ensuring every connection stays clear and organized.
If it stops running (for example, after a reboot or Windows update), QuickBooks won’t be able to recognize your network connections, and H202 may reappear.
Here’s a quick tip:
This is one of the most common mistakes users make — and it almost always leads to hosting conflicts.
Remember, only one computer (your server) should host the company file. All other systems should be set to “Local Files Only.” If multiple workstations try to host at the same time, QuickBooks gets confused about which one to prioritize, and that’s when the H202 error strikes.
So, make it a regular part of your workflow to check that only your server is hosting multi-user access (see Solution 9 for detailed steps).
Even the most stable systems can hit a bump now and then — power outages, corrupted files, or accidental deletions can happen to anyone.
Set up automatic backups within QuickBooks (you can find this under File > Back Up Company > Create Local Backup). This ensures that even if a network issue or file error occurs, your financial data stays safe and can be restored in minutes.
Pro Tip: Store a copy of your backup in a secure cloud location as well as locally on the server.
Your network is the bridge that connects QuickBooks across computers — and if that bridge wobbles, so does your connection.
Here’s how to keep it strong:
If your office relies on multiple routers or switches, ask your IT admin to verify that they’re properly configured for data sharing.
Schedule a monthly QuickBooks “health check.” Take 15 minutes to:
A little proactive maintenance goes a long way in keeping your system running like clockwork.
If multiple people in your company use QuickBooks, make sure everyone understands how multi-user mode works — and what not to do (like moving the company file or trying to host from their workstation).
A quick internal guide or training session can prevent small mistakes that lead to major downtime.
By following these preventive practices, you’re not just fixing an error — you’re building a smoother, more resilient QuickBooks setup that can handle your growing business without interruption.
Image: Team Collaboration Visual – Smooth Multi-User Mode Operation
If you’ve carefully walked through every solution above and QuickBooks Error H202 is still flashing on your screen — don’t worry. You’ve already tackled 90% of what usually causes this issue, which means you’re very close to the finish line.
At this stage, the problem probably isn’t within QuickBooks itself anymore but within your network infrastructure — the routers, LAN connections, or DNS configurations that help your computers “talk” to each other.
Let’s go over what you can do next before calling in advanced support.
Sometimes, the issue has nothing to do with QuickBooks — it’s the network hardware quietly acting up.
If your local area network (LAN) is unstable or dropping packets, QuickBooks can lose its connection to the server and throw the H202 error.
Here’s how to test it:
If you’re on Wi-Fi, consider switching your QuickBooks workstations to wired Ethernet connections for faster, more consistent communication.
Some third-party security programs — like Norton, McAfee, Bitdefender, or Kaspersky — have aggressive firewall settings that may still be blocking QuickBooks, even if your Windows Firewall is configured correctly.
To check if that’s the case:
If the error disappears, you’ve found your culprit.
Next, go into your antivirus settings and add QuickBooks and its Database Server Manager as trusted applications so they’re no longer blocked.
Once you’ve made those exceptions, re-enable your firewall right away — you always want to keep your system protected once the test is done.
Sometimes, QuickBooks can’t find the right “address” for your server if multiple devices on your network are using similar IPs or if your DNS settings are off.
If you’re comfortable with basic networking, try the following:
If that feels too technical — no problem. This is exactly the type of issue your network administrator or IT support can resolve quickly.
If none of these steps resolve the issue, it’s time to call in the experts.
Reach out to Support team and get help with your QuickBooks Desktop from for advanced troubleshooting. Their team can remotely check your setup, pinpoint the exact cause of the error, and help you reconfigure your system if needed.
You can contact them directly through the QuickBooks Tool Hub or the official Intuit Support website.
Pro Tip: Have your QuickBooks version, Windows edition, and network setup details ready when you call. This helps the support team diagnose the problem faster.
QuickBooks Multi-User Mode is designed to let multiple team members — accountants, bookkeepers, or managers — access the same company file at the same time. It’s what makes collaboration seamless across departments and keeps everyone working with real-time financial data.
But here’s the catch: For that smooth collaboration to work, QuickBooks needs a clear and stable network connection between every workstation and the central host. If that connection is misconfigured — even slightly — QuickBooks can’t tell where the company file lives, and that’s when you get hit with Error H202.
Below is the exact process to ensure your QuickBooks environment is clean, stable, and optimized for multi-user collaboration.
Before anything else, decide which computer will be your host — the one that stores the company file and runs the QuickBooks Database Server Manager (QBDBSM).
This host acts as the command center for all data traffic between QuickBooks users.
Why it matters: When multiple computers try to host simultaneously, QuickBooks gets confused about who’s in charge. That’s how H202 (or its cousin H505) appears — almost instantly.
If more than one computer is hosting, QuickBooks throws H202 almost instantly. Always have one, and only one, designated host.
Next, install the QuickBooks Database Server Manager (QBDBSM) on your host computer.
You can find it in your QuickBooks installation package or download it directly from Intuit’s official site.
Here’s what to do:
Once installed, QBDBSM runs in the background, managing data requests and permissions between all connected users.
Think of Database Server Manager as the translator between QuickBooks and your Windows network. If it isn’t installed or running, workstations simply can’t find your company file — the primary cause of H202.
Now that the Database Server Manager is ready, it’s time to tell it where your company files live.
This helps QuickBooks map and manage your data correctly across the network.
Once the scan completes, you’ll see a confirmation message indicating that the folder is now accessible. This step ensures QuickBooks and your network are properly synced.
After scanning, go to your company file folder and check for a file with the .ND extension (for example: CompanyName.qbw.nd).
This file should show a new timestamp — meaning it has been regenerated successfully by Database Server Manager.
If the .ND file looks old or isn’t updating:
Quick Insight: The .ND file is like your QuickBooks network map. A missing or outdated one is equivalent to using an old GPS address — it simply can’t find the destination.
Now that your host is ready, it’s time to make sure every workstation can connect.
This is where you confirm that your setup actually works in real-world use.
On each workstation:
If it opens successfully — congratulations, your multi-user mode is properly configured!
If not, note any messages (like H202 or H505) and verify that:
QuickBooks Error H202 can be incredibly frustrating — especially when you’re trying to keep your business operations running smoothly across multiple users. But the truth is, this error is completely fixable once you understand what’s causing it.
In most cases, the root issue boils down to one of three things:
By walking through each of the fixes outlined in this guide — from testing your network connection and running the QuickBooks File Doctor to configuring your Database Server Manager and verifying hosting — you can methodically eliminate every possible cause.
The best part? Once it’s fixed properly, QuickBooks multi-user mode runs seamlessly again — letting your entire team access the same company file without interruptions or delays.
If the error ever returns, you now have a complete roadmap to troubleshoot it confidently. And if things get too complex, remember that Intuit’s QuickBooks Support team or your IT professional can help diagnose deeper network issues in minutes.
Let’s wrap up with a few quick answers to the most common questions users have about QuickBooks Error H202.
1. What is QuickBooks Error H202?
QuickBooks Error H202 pops up when your QuickBooks Desktop on one computer can’t communicate with the server where your company file is stored. This usually happens because of a network connectivity problem, firewall blockage, or incorrect hosting configuration.
In simpler terms: your QuickBooks is trying to reach the server but can’t get through — and that’s when it throws the H202 error message.
2. Can I fix Error H202 without IT help?
Absolutely, yes.
Most users can fix Error H202 on their own by following the right sequence of troubleshooting steps — like running the QuickBooks File Doctor, verifying that hosting is enabled only on the server, and testing the network connection using simple command-line tools.
If you’ve followed this guide step by step, you’ve already done most of what an IT tech would do — and in many cases, that’s enough to get QuickBooks running in multi-user mode again.
3. Why does Error H202 keep recurring?
If you notice H202 showing up repeatedly, it usually means something is still interfering with your network connection or server setup.
Common reasons include:
The best way to prevent recurrence is to keep your QuickBooks services running automatically, maintain consistent network connectivity, and regularly check that only the main server is hosting.
4. Will reinstalling QuickBooks fix the error?
In most cases, no — reinstalling QuickBooks isn’t necessary for H202. The issue usually lies in your network setup or service configuration, not in the software installation itself.
Before going through the hassle of reinstalling, always try reconfiguring your firewall, Database Server Manager, and folder permissions. These are the real areas where H202 typically originates.
However, if you suspect that your installation is corrupted — for example, if QuickBooks won’t launch at all or other errors appear — running the QuickBooks Install Diagnostic Tool or performing a clean install might help.
Get your multi-user mode running again — fast, safe, and guaranteed.